c + shi + f12
딱 필요한 것만 놔두고 다 없앰

ConstraintLayout 으로 되어있는데
Code로도 확인할 수 있다.

ConstraintLayout말고 Linearlayout을 쓰기 위해서
<TextView 부분을 다 지워버린다.

디자인, 설계도, 둘다 같이 보는 거 가능한데 옵션 3가지 중에 디자인 고른거다.

안드로이드는 view group과 view로 나뉨
view group - 레이아웃
view - 버튼, 텍스트뷰......
레이아웃 종류 4가지 - 리니어, 렐러티브, 그리드, 제약
- 리니어 : div랑 비슷(방향이 위에서 부터 밑으로 내려옴/새로 배치 - 수직적임.) 세로방향 가로방향 두가지가 있음.
android:orientation="vertical"
- Relative : 관계하는 레이아웃 어디랑? 4벽이나 다른 아이템들이랑 관계 최소 두군데랑 관계를 맺어야 함. 그렇게 위치하면 디바이스에 따라 화면 크기가 달라짐에 따라서 움직임.
- 그리드 : 전체화면에서 칸 나누는 거
- 제약 : Relative랑 비슷한데 좀더 확장되어 있다. 기본으로 제공해주는 레이아웃아니고 import해서 사용해야 한다.
리니어 레이아웃
기본 속성 하나가 있어야함
android:orientation="vertical"

아이템들이 들어가는 모습 보기 위해서 버튼들을 몇개 넣어보자.

리니어라서 수직적으로 아래로 착착착
단위 - px말고 dp사용하세요
px 픽셀 - 절대적인 크기라서 디바이스의 화면 크기에 따라서 비율적으로 변하지 않는다.
dp (Density-independent Pixel) -비율에 따라서 변하는 단위.
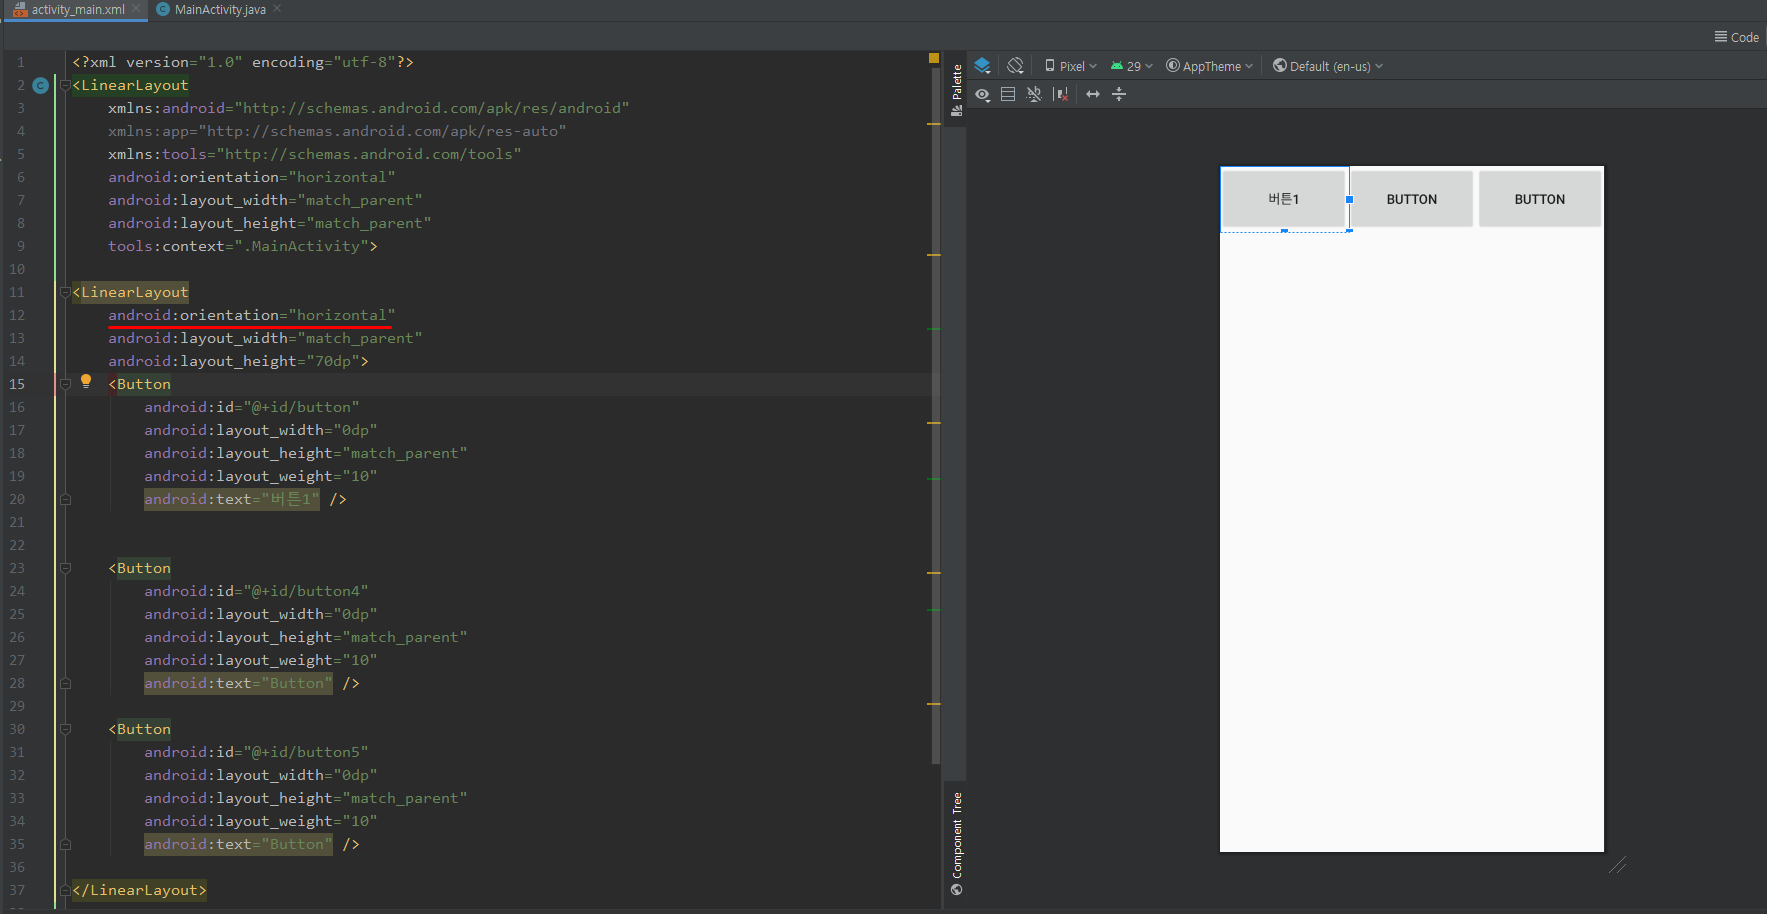
android:layout_weight="10"
정밀하게 하기위해서 두자릿 수로 한다.
10/50씩

리니어로 전체 구성을 잡아요
10/80
60/80
10/80
android:layout_weight="10"

리니어 레이아웃 속성 android:orientation="horizontal"이 기본값니다.
하지만 적어주자

리니어 레이아웃이 horizontal이나 vertical이고 안에 view에
weight가 잡혀있으면 layout_width나 layout_height는 "0dp"를 줘야한다

<?xml version="1.0" encoding="utf-8"?>
<LinearLayout
    xmlns:android="http://schemas.android.com/apk/res/android"
    xmlns:app="http://schemas.android.com/apk/res-auto"
    xmlns:tools="http://schemas.android.com/tools"
    android:orientation="vertical"
    android:layout_width="match_parent"
    android:layout_height="match_parent"
    tools:context=".MainActivity">


    <Button
        android:id="@+id/button8"
        android:layout_width="match_parent"
        android:layout_height="70dp"

        android:text="Button" />


    <LinearLayout
        android:layout_width="match_parent"
        android:layout_height="0dp"
        android:layout_weight="1"
        android:orientation="horizontal">

        <Button
            android:id="@+id/button1"
            android:layout_width="0dp"
            android:layout_height="match_parent"
            android:layout_weight="1"
            android:text="Button" />

        <Button
            android:id="@+id/button2"
            android:layout_width="0dp"
            android:layout_height="match_parent"
            android:layout_weight="1"
            android:text="Button" />

        <Button
            android:id="@+id/button3"
            android:layout_width="0dp"
            android:layout_height="match_parent"
            android:layout_weight="1"
            android:text="Button" />

        <Button
            android:id="@+id/button4"
            android:layout_width="0dp"
            android:layout_height="match_parent"
            android:layout_weight="1"
            android:text="Button" />


    </LinearLayout>

    <Button
        android:id="@+id/button9"
        android:layout_width="match_parent"
        android:layout_height="70dp"

        android:text="Button" />

저 3줄 자동으로 만들어져있는데 지우지말라고~!
글자크기는 단위가 sp
LinearLayout에서는 android:layout_gravity="" 쓰지마요..
밑에 정리해놨지만 쓰지마요.

<?xml version="1.0" encoding="utf-8"?>
<LinearLayout
    xmlns:android="http://schemas.android.com/apk/res/android"
    xmlns:app="http://schemas.android.com/apk/res-auto"
    xmlns:tools="http://schemas.android.com/tools"
    android:orientation="vertical"
    android:layout_width="match_parent"
    android:layout_height="match_parent"
    tools:context=".MainActivity">
<LinearLayout
    android:layout_gravity="center"
    android:orientation="horizontal"
    android:layout_width="wrap_content"
    android:layout_height="match_parent">
    <Button
        android:id="@+id/button10"
        android:layout_width="100dp"
        android:layout_height="100dp"
        android:layout_gravity="center"
        android:text="Button"
        android:textSize="15sp"/>

</LinearLayout>


</LinearLayout>android:gravity="right|center"
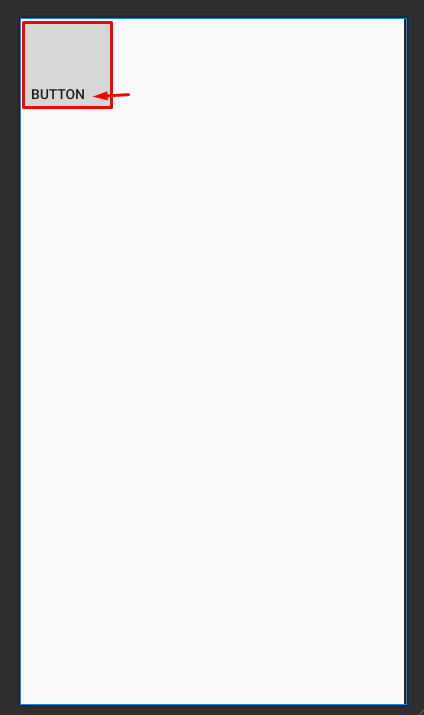
view 내부에서 어디에 배치하는지 값주기.

<?xml version="1.0" encoding="utf-8"?>
<LinearLayout
    xmlns:android="http://schemas.android.com/apk/res/android"
    xmlns:app="http://schemas.android.com/apk/res-auto"
    xmlns:tools="http://schemas.android.com/tools"
    android:orientation="horizontal"
    android:layout_width="match_parent"
    android:layout_height="match_parent"
    tools:context=".MainActivity">

    <Button
        android:id="@+id/button10"
        android:layout_width="100dp"
        android:layout_height="100dp"
        android:gravity="bottom"
        android:text="Button"
        android:textSize="15sp"/>

</LinearLayout>
중간에 둥둥 떠다니게 배치하고 싶으면
<LinearLayout안쓰고 제약 레이아웃으로 쉽게 할 수 있다.
bias (치우침)
'안드로이드' 카테고리의 다른 글
| RelativeLayout -layout_alignParentBottom, layout_toRightOf, layout_below + 단점. (0) | 2020.07.09 |
|---|---|
| Surface 개념, LinearLayout복습(시리얼 통신) (0) | 2020.07.09 |
| 안드로이드 에뮬레이터 맨위로 올리는 방법 (0) | 2020.07.08 |
| 3강 setting (0) | 2020.07.08 |
| 2강 문서(Jetbrain, Kotlin, Jetpack , codelab, 디자인 가이드라인-meterial) (0) | 2020.07.08 |


